忍者ブログ

3Dプリンター デビュー

3Dプリンターを購入しました。
知りたい事も多いので「キット品」を購入し自分で組立てました。
足りない物を購入したり本業で忙しかったりと、1ケ月はゆうに超えた気がしますが昨夜、
テスト稼働(印字・・・プリンターなんで?)に成功しました。

祝、初印字。指定ソフトに付属のマスコットです。

CuraV1.4(ABS・クリヤー1.75・T:230度・B:65度)

上記に手元に有った色(タミヤアクリル・クリヤーブルー)で塗ってみました。
ABSなんで塗装も可能なはず・・・。

- - - - 私 的 評 価 - - - -

利点:
1.比較的簡単に立体物が作成可能
2.筐体作成も含めて面白い(おもちゃ的で有りながら、このクォリティー)

欠点:
1.上記を見る限り、私の求めるレベルの表面処理では無い。
2.クリヤーも有効では無く(白色が良いのかなぁ?)
3.材質が硬いので良いニッパーが必要(タミヤ・ITEM 74001・精密ニッパーなら良いか?)

- - - - 私 的 評 価 - - - -
今の所こんな感じ。
今後の運用方法を模索する必要が有りますです。

※Tip・・・実は上記は2個目の出力である。
最初の出力(同品)では行程1/3でベッドから剥がれてグチャグチャになってしまった。
ネットを見ていると「のり」を使うと良いと発見。
そこで、手元にある物で作ってみた所、良さそうなので紹介。
{「水溶性・木工ボンド」を「Mr.カラーうすめ液」で溶いた物を筆でカプトンテープの上に薄く塗る・・・要らなくなったら、水かうすめ液でふき取り可能なはず}更に大きな物を高精度設定したら簡単にはがれてしまいました、先達者の行っている、ベッド110度化を検討するべき様です(2014.12.27追記)
 
今後が楽しみでは有る。

PR

1/144 HGUC F91 R59

第59夜です。

今回は、総仕上げと言うわけでも無いですが・・・台座を作って居ました。
所謂デコパージュ・・・とは言え無いかなぁ風台座です。
材質は段ボールです。
1.適当な大きさに切り出し
2.表面に防水処理としてエポキシ接着剤を塗る
3.表面、横にパテ(ポリパテ、タミヤパテ)で隙間を埋めサンディング。
4.塗装
で完成。
100円ショップで木(プラ)製が売っていますが塗装するので何でも良いとなります。
今回は転倒防止で1.0mmの真鍮線を脚の裏で篏合しています。

今夜も時間が来た様です。

(Ver.Eng)
 This time, as the total finish?
... I stay by creating a pedestal.
 
So-called, decoupage-style ... pedestal.
  The material is cardboard.

Was cut into an appropriate size: T1.

I paint the epoxy adhesive as a waterproof treatment to the surface: T2.

Sanding fills a gap in the - (putty and Tamiya putty poly) putty surface, on the side: T3.

T4: paint

Tree (plastic) made ​​has been sold at "100 yen shop," but it will order to paint, and may be any number.
 
I am connected with the back of the legs of the brass wire 1.0mm in fall prevention measures.

Time is like coming tonight.

1/48 V22 オスプレイ R10

第10夜です。


今回は、メインギヤのストラットを作って居ました。

前回の工作も納得がいかず、V-22の動画を見てもっと謎が増えてしまったのです。
悩んで居ると好機が訪れました。
横田基地祭にMV-22が展示されるとの情報を得て(新聞の公示だけど)
少しでも情報収集を・・・見てきました
(なんと!触れる事が出来たのです・・・これにはびっくりですが多分に政治的な意味があったのでしょう?)
長蛇の列に並ぶのはさすがに無理と内部は見れませんでしたが資料的価値は凄まじく、120%達成出来た気分です。
しっかり、メインギア・ドアの中も見てきました。
ここまで来ると、引き返せませんので思い切ってストラットも動かします。
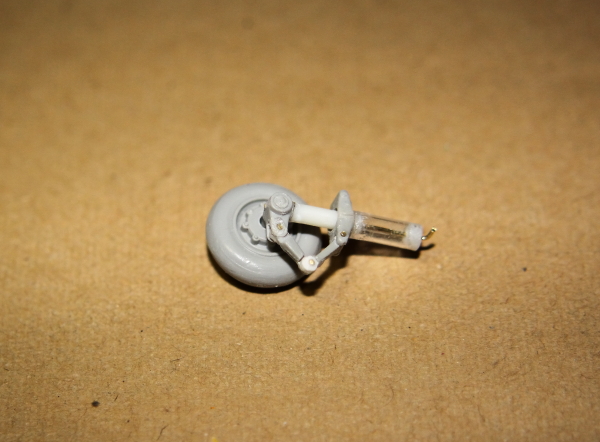
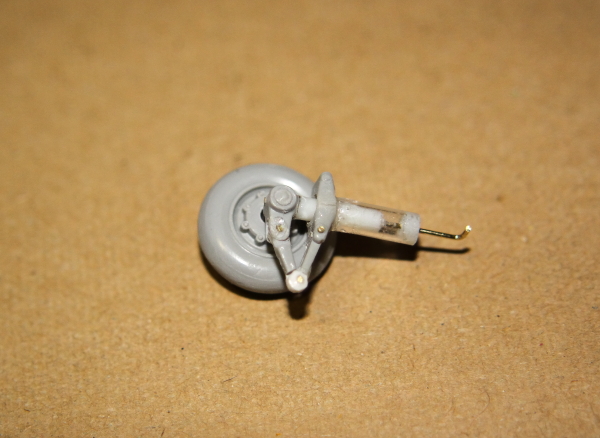
出来たのが上の写真、上は伸、下は縮を再現して居ます。
白色はタミヤ_2mmプラ棒、透明はタミヤ3mmプラパイプ、金色は0.5mm真鍮線、
グレーは純正部品です。
タイヤもセンター部分で左右に分かれますので10%程度削りました。

問題は、もう1~2個?作らなければ成りません、同じ形になるか?どうか?

今夜も時間が来たようです。


(Ver.Eng)
This time, it was stayed by creating a strut of the main gear.

  Mystery I had increased more convincing look at the videos, the V-22 also work the last.
  Opportunity visited When you are distressed.
  (I'm notice of newspaper)
I hope to
obtain information MV-22 is to be exhibited at the Yokota Air Base Festival
  You've seen ... the information gathered even a little
(It is quite amazing ・・・We were able whopping! Touching, but probably there was a political sense to maybe?)
Lining up in a long line unreasonable indeed, it was not seen inside.
However, the fiercely documentary value, I feel that it was possible to achieve 120%. 
Properly, we have seen also in the main gear door.
It does not turn back to come up here.
Strut also move decisively.
After completion is a picture, is stretched up, down will stay and to reproduce the shortening.
 "White = Tamiya _2mm PLASTICBEAMS_ROUND, transparent = Tamiya _3mm PLASTICBEAMS_PIPE, gold = 0.5mm brass wire and gray = genuine parts" materials used it.
Tire also so divided into left and right in the center part, I was filled with width about 10%.
The problem, 1-2 pieces yet? It should not be if it is not made​​.
Do the same form?

Time seems to have come tonight.

※google翻訳に独自の加筆をしたものです※

1/48 V22 オスプレイ R9.5

番外編です。
本日、ニュース動画にオスプレイが出てました。
横田基地での体験飛行(プレス向け?)の際の物ですがコクピット内が撮影されていますので資料に成るか?とリンクを貼ります
V-22_20140901_TBSニュース
これを見ると、
1.コクピット内はとても広くヘッドクリアランスは相当なもの。
2.イタレリ1/48と運転用の椅子が違う、MV-22?
3.パイロット座席の後ろにも最低1席在る
4.運転席との仕切りはドア在
の違いが判別出来ました。
どこまで再現するか?悩み処・・・多分、気にしないです(^_^)

1/48 V22 オスプレイ R9

第9夜です。

今回は、メインギヤを可動に改造していました。
各部のクリアランスを考えた摺り合わせが必要です。


引き出した処、可動部分はストラット、タイヤは無改造で機体と接続する部分に回転軸を2mmのプラ棒と0.5mmの真鍮線を使い再現して居ます。

今夜も時間が来た様です。


(Ver.E)
This time, it had been converted into a movable main gear.
Because quite difficult, you need a sliding alignment was thought the clearance of each part.

Treatment that was pulled out, moving parts is stay by reproducing use the brass wire of 0.5mm and 2mm plastic stick of the rotation axis to the part that is connected to the fuselage with no remodeling tire and strut.

Time is like coming tonight.